In a creative rut? Me too! Turns out it’s hard to keep the creative energy flowing while living in a social vacuum for a year or so. (Living with an unvaccinated, high risk, immunocompromised family member means this is far from over for us here in our little Ohio home) Because I couldn’t/can’t journey out into the world much, I brought the journey into the studio in the form of new media and techniques. Since this has been helping me, I thought I’d bring you along for some art experiments, and a little at home printmaking tutorial. Rut or no rut, I hope you find something fun along the way.
Let’s dip our toes into the unfamiliar. Let's try drawing in a new way, get out materials that don’t “fit” our style and just see where they lead us. There’s no goal except to have fun and maybe catch the creative spark that makes us think, “Oh, yeah! This is why I chose to do this thing!”
Now, I know we don’t all have a ton of time to spend experimenting, but even 15 mins or so could feel like a lot and feed that desire for the new and unexplored.
Here’s a glimpse of things I’ve tried recently:
Using media on surfaces they’re not intended for. Like watercolor pencils and pastels on unprimed canvas. See strange drawing below.
Stuck? Use a stick! Had fun drawing with a big stick dipped in ink. Have to thank the fabulous ladies at https://www.thegoodshipillustration.com/ for that one. I think I actually drew those seed pods and twigs using those same seed pods and twigs :-)
Fabric collage, plus some charcoal, plus a dried flower stem from the vase of dead flowers that I never emptied, turned into this little adventurer. (Used Mod Podge to hold it all down.)
Not really a crazy experiment, just different for me: Using gouache in a bold, flat manner. (ok, so there might also be some watercolor pencil, fabric and pastel in there.)
What you’ll need at the ready:
Tetra Pak - washed and cut open (You know, those boxy cartons you get plant milk or broth in from the dry goods isle.)
Scissors and/or exacto blade
Etching tool (Anything with a sharp point that isn’t flimsy should work, I used my needle tools that are for carving clay.)
Akua Intaglio Ink (I also tried acrylic paint with a medium extender added to keep it wet, it worked okay-ish, but not as well as the ink.)
backing board or chipboard cut into small rectangles
Tarleton (or similar e.g. vegetable net. I used cheesecloth, which worked ok, but was maybe a bit too absorbent.)
Tissue paper or pages from the phone book
Paper to print on (Thick paper is best. I used a hot press watercolor paper, but actual printmaking paper would have a better result.)
Tray/baking dish with water to soak paper in
Blotting Paper (or tea towel) for blotting your soaked paper
Tea towel/rag to use as your printing surface
Baking parchment or tracing paper
Spoon
One thing I love about using the tetra pak instead of a metal plate, is you can cut them into whatever shape you like or stick with a traditional rectangle. The possibilities are endless!
Once you have your (clean) tetra pak cut into whatever shape you like, use an etching tool (a nail or whatever you’ve got) to draw your image into the silver surface. Don't forget! It’s going to print in reverse, so plan accordingly.
Wherever you etch a line, that’s where the ink will settle. When you print, your paper will press into the lines slightly, grabbing the ink from the groove.
It’s best to print onto damp paper, so before you start inking your plate is a good time to put it to soak in your tray of water.
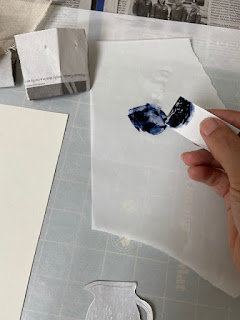
Once you have your image, use the edge of a small bit of chipboard or other firm board to wipe some ink across the surface, As you scrape it across, ink gets pressed down into your line work.
Next up! We wipe it, wipe it real good. Well, not too good. Using some kind of mesh material, (traditionally tarleton) you want to gently wipe the surface in a circular motion, not too hard or you may remove ink from the grooves. Wipe until the silver surface starts to show again.
Finish wiping with tissue paper or phone book pages (You can experiment with how much ink you remove to get different qualities of print. If you leave more ink, it will create an atmospheric but less controlled print.)
Place your inked plate on a non slippery surface like a tea towel that you don’t mind getting inky. (I forgot this part and mine was definitely trying to get away from me.)
Wipe off the ink that you definitely got all over your hands.
Remove your paper from the water and blot it gently so it's no longer dripping.
Lay the damp paper on top of your inked plate, then a sheet of parchment or tracing paper on top of that. (It will help with the rubby spoony bit coming up.)
Now we press like the dickens with the back of a spoon. Make sure you get every part of your print. I found I had to press/rub pretty firmly and for some time. (But, perhaps that’s because of my little bird arms, and the wooden spoon I was using. Metal would probably be best.)
And tada! It is print!
Here’s to having fun, letting go, and finding our way back to our creative energy! Hope you all have fun with your experiments.
~~~~~~~~~~~~~~~~~~~~~~~~~~~~~~~~~~~~~~~~~~~~~~~~~

Tenaya Lena Gunter Brown is an illustrator/author. Born and raised in Oakland, CA, she makes stories and art that speak to our wonder, our connection to each other and the earth under our feet.
Find more of her work at https://www.tenayalena.com/
Instagram @tenayalena


No comments:
Post a Comment